

 分类:
.NET Core
分类:
.NET Core
IdentityServer4是为ASP.NET CORE量身定制的实现了OpenId Connect和OAuth2.0协议的认证授权中间件。
脑图网站:https://naotu.baidu.com/file/75b251257ce27cfa62e0ad7f47b75576?token=e2db617be22b6274
今天我们讲解的是关于net core 中用IdentityServer4 做单点登录和注册登录。
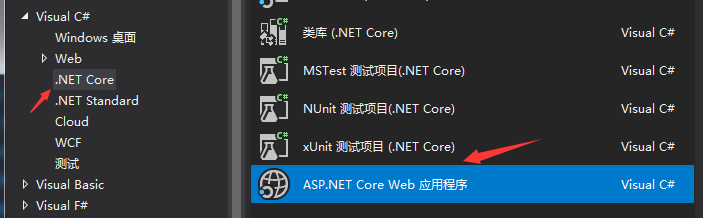
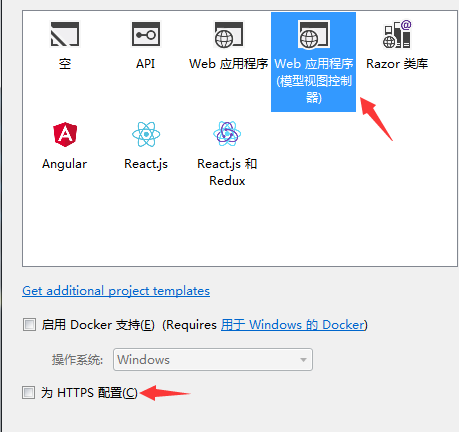
1,我们需要新建一个net core 的项目,如下图:
2,我们需要新建一个登录的控制器,封装登录的方法 (首页视图登录和判断逻辑最好分开),代码如下:
     [HttpGet]
      public IActionResult Login(string returnUrl = null)
        {
            ViewData["returnUrl"] = returnUrl;
            return View();
        }
        /// <summary>
        /// 登录post回发处理
        /// </summary>
        [HttpPost]
        public async Task<IActionResult> Login(string userName, string password, string returnUrl = null)
        {
            ViewData["returnUrl"] = returnUrl;
              Customers customers= _userDAL.Login(userName, password);
            //UserDAL userDAL = new UserDAL();  //不予许实例化对象
            if (customers != null)
            {
                AuthenticationProperties props = new AuthenticationProperties
                {
                    IsPersistent = true,
                    ExpiresUtc = DateTimeOffset.UtcNow.Add(TimeSpan.FromDays(1)),
                };
                //注意这里应该引用Microsoft.AspNetCore.Http这个下面的
                await HttpContext.SignInAsync("10000", userName, props);
                //HttpContext.SignOutAsync();
                if (returnUrl != null)
                {
                    return Redirect(returnUrl);
                    //return Redirect("http://localhost:44396/home/index");
                }
                return View();
            }
            else
            {
                return Content("登录失败");
            }
        }
前台代码如下:
<html>
<head>
    <meta name="viewport" content="width=device-width" />
    <title>Login</title>
</head>
<body>
    <div align="center">
        <h1>.net58统一认证登录中心</h1>
        <form method="post" action="/Acount/Login">
            用户名:<input type="text" name="userName" /><br />
            密  码:<input type="password" name="password" />
            <input type="hidden" name="returnUrl" value="@ViewData["returnUrl"]" /> <br />
            <input type="submit" value="登录" />
        </form>
    </div>
</body>
</html>
3,我们需要添加一个类,Config,在里面实现单点登录的方法,当然也需要依赖注入identityServer4,代码如下:
 public class Config
    {
        //下载ids4的依赖:install-package IdentityServer4  -version 2.1.1
        // scopes define the resources in your system
        public static IEnumerable<IdentityResource> GetIdentityResources()
        {
            return new List<IdentityResource>
            {
                new IdentityResources.OpenId(),
                new IdentityResources.Profile(),
            };
        }
        // clients want to access resources (aka scopes)
        public static IEnumerable<Client> GetClients()
        {
            return new List<Client>
            {
                // OpenID Connect隐式流客户端(MVC)
                new Client
                {
                    ClientId = "net58.order",
                    ClientName = "MVC Client",
                    AllowedGrantTypes = GrantTypes.Implicit,//隐式方式
                    RequireConsent=false,//如果不需要显示否同意授权 页面 这里就设置为false
                    RedirectUris = { "http://localhost:60944/signin-oidc", "http://localhost:33447/account/index" },//登录成功后返回的客户端地址
                    //PostLogoutRedirectUris = { "http://localhost:60944/signout-callback-oidc" },//注销登录后返回的客户端地址
                    AllowedScopes =
                    {
                        IdentityServerConstants.StandardScopes.OpenId,
                        IdentityServerConstants.StandardScopes.Profile
                    }
                },
                 new Client
                {
                    ClientId = "net58.product",
                    ClientName = "MVC Client",
                    AllowedGrantTypes = GrantTypes.Implicit,//隐式方式
                    RequireConsent=false,//如果不需要显示否同意授权 页面 这里就设置为false
                    RedirectUris = { "http://localhost:61739/signin-oidc", "http://localhost:33447/account/index" },//登录成功后返回的客户端地址
                    //PostLogoutRedirectUris = { "http://localhost:61739/signout-callback-oidc" },//注销登录后返回的客户端地址
                    AllowedScopes =
                    {
                        IdentityServerConstants.StandardScopes.OpenId,
                        IdentityServerConstants.StandardScopes.Profile
                    }
                }
            };
        }
    }
思路分析:我们可以NuGet包依赖注入ids4,后面的ClientId,ClientName,RedirectUris 就分别配置为其他两个单点项目的Startup.cs服务里
4,我们需要在登录项目的Startup.cs服务里配置Ids4服务的相关文件,代码如下:
 public void ConfigureServices(IServiceCollection services)
        {
            //好像是欧盟联盟协议的cookie,要注释
            //services.Configure<CookiePolicyOptions>(options =>
            //{
            //    // This lambda determines whether user consent for non-essential cookies is needed for a given request.
            //    options.CheckConsentNeeded = context => true;
            //    options.MinimumSameSitePolicy = SameSiteMode.None;
            //});
            services.AddIdentityServer()//Ids4服务
             .AddDeveloperSigningCredential()//添加开发人员签名凭据
             .AddInMemoryIdentityResources(Config.GetIdentityResources()) //添加内存apiresource
             .AddInMemoryClients(Config.GetClients());//把配置文件的Client配置资源放到内存

            services.AddMvc().SetCompatibilityVersion(CompatibilityVersion.Version_2_1);
        }
        // This method gets called by the runtime. Use this method to configure the HTTP request pipeline.
        public void Configure(IApplicationBuilder app, IHostingEnvironment env)
        {
            if (env.IsDevelopment())
            {
                app.UseDeveloperExceptionPage();
            }
            else
            {
                app.UseExceptionHandler("/Home/Error");
            }
            app.UseStaticFiles();
            app.UseCookiePolicy();
            //启动ids4中间件
            app.UseIdentityServer();
            app.UseMvc(routes =>
            {
                routes.MapRoute(
                    name: "default",
                    template: "{controller=Home}/{action=Index}/{id?}");
            });
        }
tip:初学者可以参考里面的配置,没有的要加上哦。
5,项目就需要在子项目进行配置了 (这里做功能测试,所以只建了两个子项目,大型项目的话可以弄多个进行单点登录的)
这里,我们新建商品和价格,两个子项目来进行单点登录。
//下载ids4的依赖:install-package IdentityServer4 -version 2.1.1
Startup.cs服务里配置代码如下图:
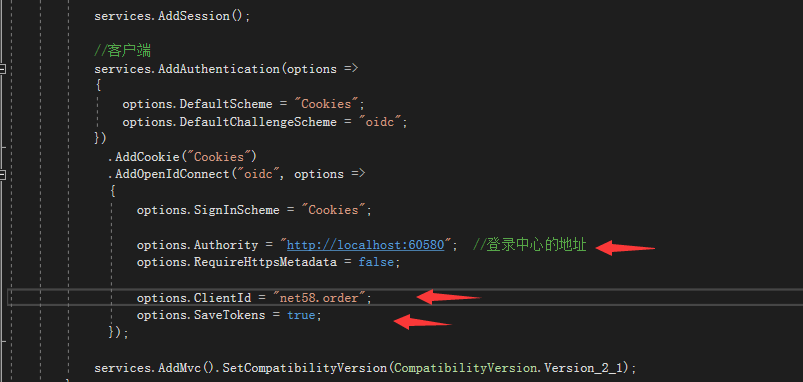
app.UseStaticFiles();
app.UseCookiePolicy();
//身份验证 批准; 授权
app.UseAuthentication();
//启动session 中间件
app.UseSession();
app.UseMvc(routes =>
{
routes.MapRoute(
name: "default",
template: "{controller=Home}/{action=Index}/{id?}");
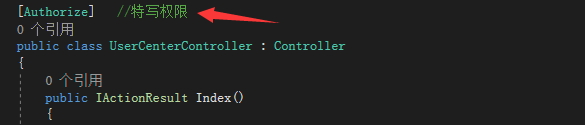
}); 在新建的控制器,只需要一个特写权限,视图的话就写上登录成功访问就行了。
这个价格子项目配置好了之后,另外那个商品子项目的配置也一致。
下面我们就可以运行子项目,开始你访问该控制器(UserCenter)下的index视图,他会跳转到登录项目进行登录
登录成功后就返回到当前的价格子项目,然后我们再运行商品子项目,会发现他就不需要登录就可以访问index视图下的登录成功访问的话语。
tip:运行时,我们可以清楚看到登录界面和登录成功后的页面的路由路径是不一致的,所以就实现了单点登录的效果。
第二项内容就是:实现注销登录:(随便一个子项目退出登录,其他项目也就退出了登录)
1,在以上的基础上,还是在登录控制器封装注销登录的方法,代码如下:
public class AccountController : Controller
    {
//依赖注入:做注销登录
        private readonly IIdentityServerInteractionService _interaction;
        public AccountController(IIdentityServerInteractionService interaction)
        {
            _interaction = interaction;

        }
        //注销登录
        [HttpGet]
        public async Task<IActionResult> Logout(string logoutId)
        {
            var logout = await _interaction.GetLogoutContextAsync(logoutId);
            await HttpContext.SignOutAsync();
            //if (logout.PostLogoutRedirectUri != null)
            //{
            //    return Redirect(logout.PostLogoutRedirectUri);
            //}
            //获取客户端点击注销登录的地址
            var refererUrl = Request.Headers["Referer"].ToString();
            if (!string.IsNullOrWhiteSpace(refererUrl))
            {
                return Redirect(refererUrl);
            }
            else
            {
                //获取配置的默认的注销登录后的跳转地址
                if (logout.PostLogoutRedirectUri != null)
                {
                    return Redirect(logout.PostLogoutRedirectUri);
                }
            }
            return View();
        }
2,在价格子项目为例:在UserCenter控制器加一个视图类:
//退出登录
public IActionResult LoginOut()
        {
            return SignOut("Cookies", "oidc");
        }
3,最后一步,我们就在子项目随便一个控制器运行,然后写连接跳转到退出登录的控制器下的类访问就可以实现退出,他就会返回该子项目
且处于未登录状态,我们以另外一个商品项目启动运行,访问那个提示登录成功访问的视图,发现需要重新登录。
效果完成后就达到单点注销登录啦。 不容易呀,知识还是需要慢慢啃哦,加油。


 50010702506256
