

 分类:
JAVA
分类:
JAVA
Spring MVC是一款基于MVC架构模式的轻量级Web框架,其目的是将Web开发模块化,对整体架构进行解耦,简化Web开发流程。
下面我们使用idea和maven搭建一个Spring MVC项目。
1,创建项目:File-New-Project

点击"Next"

选择maven配置,在idea中默认了配置,选择好后点击"Next"

项目命名后点击"Finish"
2,项目创建好后,idea会下载默认配置文件等,完成后打开pom.xml,在配置中加入Spring MVC所需的jar包:
<?xml version="1.0" encoding="UTF-8"?>
<project xmlns="http://maven.apache.org/POM/4.0.0" xmlns:xsi="http://www.w3.org/2001/XMLSchema-instance"
xsi:schemaLocation="http://maven.apache.org/POM/4.0.0 http://maven.apache.org/xsd/maven-4.0.0.xsd">
<modelVersion>4.0.0</modelVersion>
<groupId>com.SpringMVC</groupId>
<artifactId>SpringMVC</artifactId>
<version>1.0-SNAPSHOT</version>
<packaging>war</packaging>
<name>SpringMVC Maven Webapp</name>
<!-- FIXME change it to the project's website -->
<url>http://www.example.com</url>
<properties>
<project.build.sourceEncoding>UTF-8</project.build.sourceEncoding>
<maven.compiler.source>1.7</maven.compiler.source>
<maven.compiler.target>1.7</maven.compiler.target>
<spring.version>5.0.0.RELEASE</spring.version>
</properties>
<dependencies>
<dependency>
<groupId>junit</groupId>
<artifactId>junit</artifactId>
<version>4.11</version>
<scope>test</scope>
</dependency>
<dependency>
<groupId>org.springframework</groupId>
<artifactId>spring-beans</artifactId>
<version>${spring.version}</version>
</dependency>
<dependency>
<groupId>org.springframework</groupId>
<artifactId>spring-context</artifactId>
<version>${spring.version}</version>
</dependency>
<dependency>
<groupId>org.springframework</groupId>
<artifactId>spring-web</artifactId>
<version>${spring.version}</version>
</dependency>
<dependency>
<groupId>org.springframework</groupId>
<artifactId>spring-webmvc</artifactId>
<version>${spring.version}</version>
</dependency>
<dependency>
<groupId>org.springframework</groupId>
<artifactId>spring-core</artifactId>
<version>${spring.version}</version>
</dependency>
<dependency>
<groupId>org.springframework</groupId>
<artifactId>spring-context</artifactId>
<version>${spring.version}</version>
</dependency>
</dependencies>
<build>
<finalName>SpringMVC</finalName>
<pluginManagement><!-- lock down plugins versions to avoid using Maven defaults (may be moved to parent pom) -->
<plugins>
<plugin>
<artifactId>maven-clean-plugin</artifactId>
<version>3.0.0</version>
</plugin>
<!-- see http://maven.apache.org/ref/current/maven-core/default-bindings.html#Plugin_bindings_for_war_packaging -->
<plugin>
<artifactId>maven-resources-plugin</artifactId>
<version>3.0.2</version>
</plugin>
<plugin>
<artifactId>maven-compiler-plugin</artifactId>
<version>3.7.0</version>
</plugin>
<plugin>
<artifactId>maven-surefire-plugin</artifactId>
<version>2.20.1</version>
</plugin>
<plugin>
<artifactId>maven-war-plugin</artifactId>
<version>3.2.0</version>
</plugin>
<plugin>
<artifactId>maven-install-plugin</artifactId>
<version>2.5.2</version>
</plugin>
<plugin>
<artifactId>maven-deploy-plugin</artifactId>
<version>2.8.2</version>
</plugin>
</plugins>
</pluginManagement>
</build>
</project>
点击Import Changes,下载所需的jar包。
完成后在src/main/webapp下新建文件夹:“Java”,“Resource”。

右键点击Java文件夹,Mark Directory as->Sources Root,
右键点击Resource文件夹,Mark Directory as -> Resources Root。
3,在src/main/webapp/WEB-INF下创建文件夹"views",在"views"文件夹中添加jsp文件“Index”:

在Resource文件夹中新建一个xml文件,命名为“dispatcher-servlet”(前端控制器),
配置dispatcher-servlet.xml:
<?xml version="1.0" encoding="UTF-8"?>
<beans xmlns="http://www.springframework.org/schema/beans"
       xmlns:xsi="http://www.w3.org/2001/XMLSchema-instance" xmlns:mvc="http://www.springframework.org/schema/mvc"
       xmlns:context="http://www.springframework.org/schema/context"
       xsi:schemaLocation="http://www.springframework.org/schema/beans
      http://www.springframework.org/schema/beans/spring-beans.xsd
      http://www.springframework.org/schema/mvc
      http://www.springframework.org/schema/mvc/spring-mvc.xsd
      http://www.springframework.org/schema/context
      http://www.springframework.org/schema/context/spring-context.xsd">
    <!--开启上下文注解-->
    <context:annotation-config/>
    <!--启动注解驱动的springmvc功能-->
    <mvc:annotation-driven/>
    <!--启动包扫面功能-->
    <context:component-scan base-package="cn.com.controller"/>
    <!--视图解析器-->
    <bean class="org.springframework.web.servlet.view.InternalResourceViewResolver">
        <!--解析view前缀-->
        <property name="prefix" value="/WEB-INF/views/" />
        <!--解析view后缀-->
        <property name="suffix" value=".jsp" />
    </bean>
</beans>
配置src/main/webapp/WEB-INF/web.xml:
Archetype Created Web ApplicationspringMVCorg.springframework.web.servlet.DispatcherServletcontextConfigLocationclasspath:dispatcher-servlet.xmlspringMVC/index.jsp
在Java文件夹下创建包"cn.com.controller",并在包下创建一个java类"Home"。
编写Home类:
package cn.com.controller;

import org.springframework.stereotype.Controller;
import org.springframework.web.bind.annotation.RequestMapping;

@Controller
@RequestMapping("/Home")
public class Home {
    @RequestMapping("/Index")
    public String Index(){
        return "Index";
    }
}
4,配置Tomcat:


大功告成!
运行Tomcat

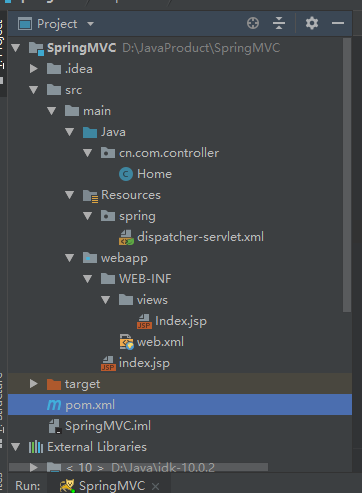
目录结构:
CSDN资源下载:https://download.csdn.net/download/wkjiteye/10838104


 50010702506256
