首页
视频
资源
登录
原
CNI IPVLAN MACVLAN
3258
人阅读
2022/12/13 21:40
总访问:
2592851
评论:
0
收藏:
0
手机
分类:
容器编排
 ># CNI IPVLAN MACVLAN [TOC] 前言 ------------ tn2>我们前面讲了Vxlan、IPIP、UDP、、等等一大堆,我不晓得大家有没有统计过要走多少次内核。 以Flannel Vxlan为例子。  tn2>首先我们的Pod需要通过内核封装数据包,发送到我们的`cni0`网桥上,网桥发送到`flannel.1`时又需要经过内核进行数据封装,最后发送到另外一台主机时还需要经过内核。内核是神啊?性能很好?没走一步就要经过它。肯定是消耗大量性能的。 如果再碰到集群中的pod里面又是一个集群的情况,那要经过的内核次数又多了。 所以IPVLAN、MACVLAN就出来了。 >### IPVLAN、MACVLAN 简述 tn2>主要功能把pod的网卡,直接拉到与主机同一平面,你访问我的pod我让它少走弯路直接连到pod中去,这样只需要经过一次内核就可以到达目标点。 tn>内核要求要高于4.2版本。 tn2>ipvlan和macvlan类似,都是从一个主机接口虚拟出多个虚拟网络接口。唯一比较大的区别就是ipvlan虚拟出的子接口都有相同的mac地址。 ```bash # 升级内核 rpm --import https://www.elrepo.org/RPM-GPG-KEY-elrepo.org rpm -Uvh http://www.elrepo.org/elrepo-release-7.0-3.el7.elrepo.noarch.rpm yum --enablerepo=elrepo-kernel install kernel-ml-devel kernel-ml -y grub2-set-default 0 reboot uname -rs ```  >### IPVLAN 模式 tn2>可查看我以往的文章:https://www.tnblog.net/hb/article/details/6279 Kubernetes IPVLAN L2模式 ------------ tn2>首先默认情况厦Kubernetes自带ipvlan的插件(我们可以通过`ls /opt/cni/bin`) 所以我们默认只需要为每个节点配置网络即可(`vim /etc/cni/net.d/10-ipvlan.conf`)。 ```json { "name": "ipvlannet", "type": "ipvlan", "master": "eth0", "mode": "l2", "ipam": { "type": "host-local", "subnet": "10.211.55.0/24", "rangeStart": "10.211.55.129", "rangeEnd": "10.211.55.250", "gateway": "10.211.55.1", "routes": [ { "dst": "0.0.0.0/0" } ] } } ``` ```json // master 节点 10.211.55.7 { "name": "ipvlannet", "type": "ipvlan", "master": "eth0", "mode": "l2", "ipam": { "type": "host-local", "subnet": "10.211.55.0/24", "rangeStart": "10.211.55.129", "rangeEnd": "10.211.55.139", "gateway": "10.211.55.1", "routes": [ { "dst": "0.0.0.0/0" } ] } } // node1 节点 10.211.55.8 { "name": "ipvlannet", "type": "ipvlan", "master": "eth0", "mode": "l2", "ipam": { "type": "host-local", "subnet": "10.211.55.0/24", "rangeStart": "10.211.55.140", "rangeEnd": "10.211.55.149", "gateway": "10.211.55.1", "routes": [ { "dst": "0.0.0.0/0" } ] } } // node2 节点 10.211.55.9 { "name": "ipvlannet", "type": "ipvlan", "master": "eth0", "mode": "l2", "ipam": { "type": "host-local", "subnet": "10.211.55.0/24", "rangeStart": "10.211.55.119", "rangeEnd": "10.211.55.128", "gateway": "10.211.55.1", "routes": [ { "dst": "0.0.0.0/0" } ] } } ``` | 参数 | 描述 | | ------------ | ------------ | | `name` | ipvlan的网络名称。 | | `type` | `ipvlan` | | `master` | 要从属的主机接口的名称。默认为默认路由接口。 | | `ipam` | 要用于此网络的IPAM配置(设置网段)。 | | `ipam.type` | `host-local` IPAM插件从一组地址范围中分配ip地址。它将状态本地存储在主机文件系统上,从而确保单个主机上IP地址的唯一性。 | | `ipam.subnet` | 网段范围(与主机网段范围保持一致) | | `ipam.rangeStart` | 网段开始范围 | | `ipam.rangeEnd` | 网段结束范围。 | | `ipam.gateway` | 网段网关。 | | `ipam.routes` | 要添加到容器命名空间的路由列表。每个路由都是一个带有`dst`和可选`gw`字段的字典。如果省略了`gw`,将使用`gateway`的值。 | tn2>然后我们运行一个`DaemonSet`这样确保我们的Pod再不同的节点上运行。 ```bash vim cni_demo_template.yaml ``` ```yaml apiVersion: apps/v1 kind: DaemonSet metadata: labels: app: cni name: cni spec: selector: matchLabels: app: cni template: metadata: annotations: cni: "ipvlannet" labels: app: cni spec: containers: - image: burlyluo/nettoolbox name: nettoolbox --- ``` ```bash kubectl apply -f cni_demo_template.yaml # 查看pod kubectl get pod -o wide # 尝试ping kubectl exec pod/cni-cbct6 -- ping 10.211.55.119 ```   tn2>我们通过如下命令来看mac值与主机的是否相等。 ```bash kubectl exec pod/cni-cbct6 -- ifconfig # node1上 ifconfig ```   tn2>我们发现它们的MAC地址是相等的。 接下来尝试外部通信,也是没问题的。  Kubernetes IPVLAN L3模式 ------------ tn2>L3模式下,ipvlan有点像路由器的功能,它在各个虚拟网络和主机网络之间进行不同网络报文的路由转发工作。只要父接口相同,即使虚拟机/容器不在同一个网络,也可以互相ping通对方,因为ipvlan会在中间做报文的转发工作。<br/> L3模式下的虚拟接口不会接收到多播或者广播的报文(ipvlan的虚拟接口会显示NOARP标志),在这个模式下,所有的网络报文都会发送给父接口,因此所有的ARP过程或者多播都是在底层的父接口完成的。需要注意的是:外部网络默认情况下是不知道ipvlan虚拟出来的网络的,如果不在外部路由器上配置好对应的路由规则,ipvlan的网络是不能被外部直接访问的。 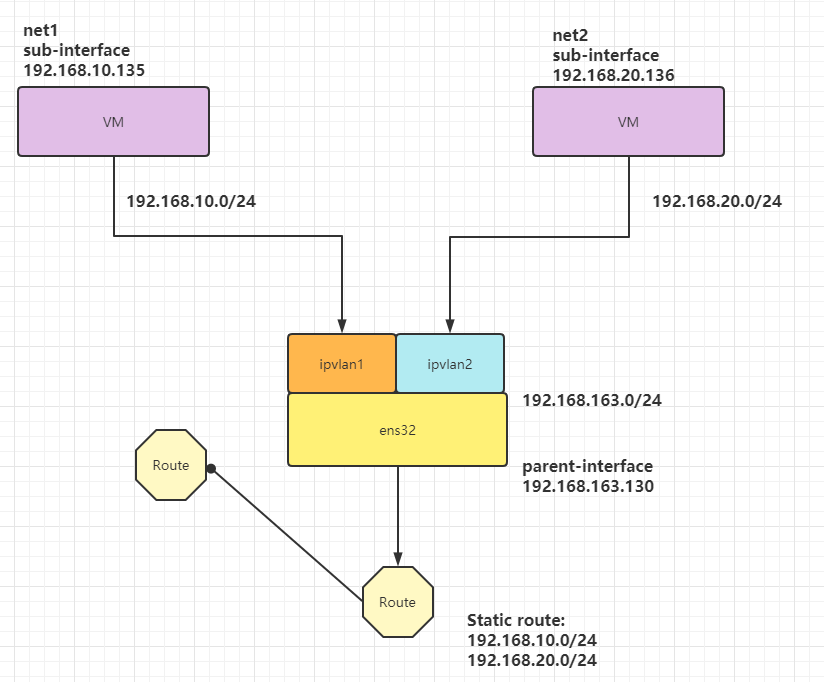 tn2>我们就可以使用为不同的节点配置不同的网段,设置不一样的网段文件了,注意把`mode`改为`l3`三层路由器模式。 ```json // master { "name": "ipvlannet", "type": "ipvlan", "master": "eth0", "mode": "l3", "ipam": { "type": "host-local", "subnet": "10.211.56.0/24" } } // node1 { "name": "ipvlannet", "type": "ipvlan", "master": "eth0", "mode": "l3", "ipam": { "type": "host-local", "subnet": "10.211.57.0/24" } } // node2 { "name": "ipvlannet", "type": "ipvlan", "master": "eth0", "mode": "l3", "ipam": { "type": "host-local", "subnet": "10.211.59.0/24" } } ``` tn2>然后为我们的pod `cni_demo_template.yaml`文件添加网络的一些权限。 ```yaml apiVersion: apps/v1 kind: DaemonSet metadata: labels: app: cni name: cni spec: selector: matchLabels: app: cni template: metadata: annotations: cni: "ipvlannet" labels: app: cni spec: containers: - image: burlyluo/nettoolbox name: nettoolbox securityContext: privileged: false capabilities: add: ["NET_ADMIN", "NET_RAW"] --- ``` tn2>然后运行起来。 ```bash kubectl apply -f cni_demo_template.yaml kubectl get pod -o wide ```  tn2>现在两个pod由于没有路由是ping不通的,而且他们的节点也同样没有路由。 所以我们需要先配置路由才可以进行访问。 首先我们配置node1上的节点路由与pod cni-jslth 路由,然后配置node2上的节点路由与pod cni-9v5w6的路由。 ```bash # node1 pod 配置路由 kubectl exec pod/cni-jslth -- route add -net 10.211.59.0/24 dev eth0 # 配置 node1 节点路由 route add -net 10.211.59.0/24 gw 10.211.55.9 # node2 pod 配置路由 kubectl exec pod/cni-9v5w6 -- route add -net 10.211.57.0/24 dev eth0 # 配置 node2 节点路由 route add -net 10.211.57.0/24 gw 10.211.55.8 ``` tn2>然后我们再次尝试ping,就没问题了。 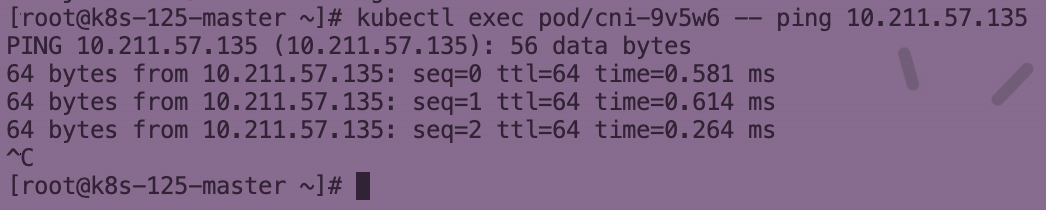 tn2>觉得麻烦的话我们可以在以后,用.net默认来添加这些路由信息。。 ## Kubernetes MACVLAN tn2>MACVLAN 只是与IPVLAN有一点不同。 它会给子接口进行分配mac地址。 所以它的问题在于:一台主机上会进行分配多台mac地址。IEEE 802.11 协议标准不喜欢同一个客户端上有多个mac地址,这意味着macvlan无法在无限网卡上进行通信。 >### 实践 tn2>我们只需要更改将类型更改为`macvlan`,并且模式改为`bridge`就可以了。 ```bash # 删除ipvlan文件 rm /etc/cni/net.d/10-ipvlan.conf # 编辑ipmac vim /etc/cni/net.d/10-macvlan.conf ``` ```json // master 节点 10.211.55.7 { "name": "ipvlannet", "type": "macvlan", "master": "eth0", "mode": "bridge", "ipam": { "type": "host-local", "subnet": "10.211.55.0/24", "rangeStart": "10.211.55.129", "rangeEnd": "10.211.55.139", "gateway": "10.211.55.1", "routes": [ { "dst": "0.0.0.0/0" } ] } } // node1 节点 10.211.55.8 { "name": "ipvlannet", "type": "macvlan", "master": "eth0", "mode": "bridge", "ipam": { "type": "host-local", "subnet": "10.211.55.0/24", "rangeStart": "10.211.55.140", "rangeEnd": "10.211.55.149", "gateway": "10.211.55.1", "routes": [ { "dst": "0.0.0.0/0" } ] } } // node2 节点 10.211.55.9 { "name": "ipvlannet", "type": "macvlan", "master": "eth0", "mode": "bridge", "ipam": { "type": "host-local", "subnet": "10.211.55.0/24", "rangeStart": "10.211.55.119", "rangeEnd": "10.211.55.128", "gateway": "10.211.55.1", "routes": [ { "dst": "0.0.0.0/0" } ] } } ``` 
欢迎加群讨论技术,1群:677373950(满了,可以加,但通过不了),2群:656732739
👈{{preArticle.title}}
👉{{nextArticle.title}}
评价
{{titleitem}}
{{titleitem}}
{{item.content}}
{{titleitem}}
{{titleitem}}
{{item.content}}
尘叶心繁
这一世以无限游戏为使命!
博主信息
排名
6
文章
6
粉丝
16
评论
8
文章类别
.net后台框架
168篇
linux
17篇
linux中cve
1篇
windows中cve
0篇
资源分享
10篇
Win32
3篇
前端
28篇
传说中的c
4篇
Xamarin
9篇
docker
15篇
容器编排
101篇
grpc
4篇
Go
15篇
yaml模板
1篇
理论
2篇
更多
Sqlserver
4篇
云产品
39篇
git
3篇
Unity
1篇
考证
2篇
RabbitMq
23篇
Harbor
1篇
Ansible
8篇
Jenkins
17篇
Vue
1篇
Ids4
18篇
istio
1篇
架构
2篇
网络
7篇
windbg
4篇
AI
18篇
threejs
2篇
人物
1篇
嵌入式
2篇
python
13篇
HuggingFace
8篇
pytorch
9篇
opencv
6篇
最新文章
最新评价
{{item.articleTitle}}
{{item.blogName}}
:
{{item.content}}
关于我们
ICP备案 :
渝ICP备18016597号-1
网站信息:
2018-2024
TNBLOG.NET
技术交流:
群号656732739
联系我们:
contact@tnblog.net
欢迎加群
欢迎加群交流技术


 分类:
容器编排
分类:
容器编排
分类:
容器编排
分类:
容器编排